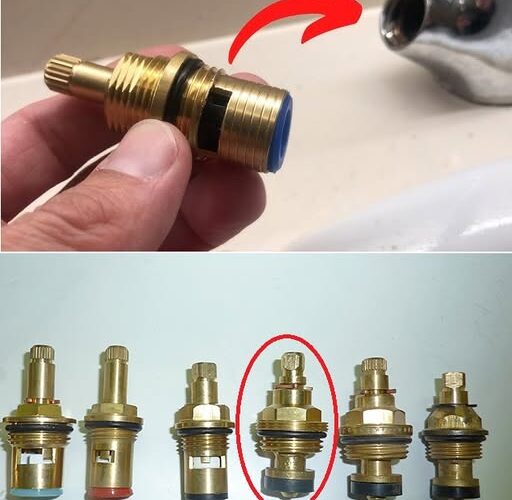

A faucet that leaks water is not only annoying, but it can also represent an unnecessary expense on the water bill. Many people are unaware that this problem can be solved easily and without the need to hire a plumber.
The key is to change the faucet mount, an easy and accessible repair for anyone. In this article, we explain what the faucet mount is, how to identify if it’s the cause of the problem, and the steps to replace it yourself.
Let’s get to work!
Materials Needed
Before you start repairing, make sure you have the following materials:
- Wrench or specialized wrench
- Screwdriver
- Replacement mount compatible with your faucet
- Teflon tape
- Rag or sponge (to clean debris and prevent damage to surfaces)
- Bucket or container to collect waste water
Procedure
1. Turn off the water supply:
Before any intervention, it is essential to cut off the water supply at the main faucet or the shut-off valve to avoid spills and facilitate the work.
2. Disassemble the tap:
Use the wrench to loosen the nut that holds the faucet at its base. Then, remove the knob or handle from the faucet with a screwdriver to access the internal parts.
3. Locate the frame:
Once the visible part of the faucet has been disassembled, look for the mount. This is located just below the nut that secures the faucet to the sink. If you’re having trouble identifying it, check your faucet manual or check diagrams online.
4. Remove the damaged frame:
If the frame is stuck, use a wrench to loosen it. In case it is corroded or broken, clean the area thoroughly before installing the new part to ensure a perfect fit.
5. Replace the frame:
Buy a frame compatible with your faucet model. Check that the size and material are adequate. Put the new mount in place, making sure to tighten it without over-tightening to avoid damage to the threads.
6. Reassemble the faucet:
Reassemble the faucet in its original position, attaching the base first and then the knob or handle. Tighten all nuts and components without applying too much pressure.
7. Check the operation:
Turn the water supply back on and check if the leak persists. If the problem has been fixed, the faucet should work properly. If the water loss continues, check that all parts are properly adjusted or consider replacing other parts such as the gasket or stem.
Additional Tips
- Pre-cleaning: Before installing the new frame, clean the area thoroughly to remove any limescale or sediment.
- Use Teflon tape: Applying Teflon tape to threads can help improve airtightness and prevent future leaks.
- General inspection: Take advantage of the repair to check the condition of other parts of the faucet and avoid future problems.
By following these steps, you will be able to fix most faucet leak problems without the need for a plumber (Plumber). In addition to saving money, you’ll gain practical plumbing knowledge that you can apply in future repairs.